Broken Steering
There have been several posts on various forums where peeps have had trouble with damaged steering and after damaging mine more than once has set me thinking about improvements
The first brakage was back in May 2010 at Bala in North Wales where I snapped a steering arm and bent the steering idler, not sure exactly at which point it happened but was really testing the limits of the Frontera as had recently fitted a front locker. Managed to borrow some spare parts tot get me home but lesson learnt meant that I now carry spare steering arms as they are a known weak point.

A few weeks ago was helping recce a Pay & Play site near Cardiff and managed to bend another steering idler and steering arm!
Had previously looked at what options were available and Independent4x in the USA do a heavy duty steering arm kit but doing a bit of reaserch on these suggested that while they stopped steering arm breakages they merely transferred the problem elsewhere and the main steering link between the steering box and idler bends instead. Given the choice of replacing steering arm or the main steering link while out its a no brainer so have stayed with the standard steering arms for now.
Looking at the angle of the steering arms on a lifted IFS its easy to see why there are problems so first target is to replace the stock arms with rose jointed links an mount on top of the steering link on the hub to reduce the angle, phase 2 is to find a LHD steering box to replace the steering idler which should hopefully reduce any probems with thee bending. Once complete will run with this for a while and see how it performs and this just leaves the steering link, need to cook up a way of improving this, not sure yet but give it time.
Frontera Steering Damper
First thing most peeps are going to say is What steering damper? Frontera’s don’t have them and there is no specific kit available for the Frontera range. So I did a bit of searching on the Internet and ended up ordering a universal kit from Llama 4×4.
So what came in the box? It came with a Rough Country steering damper plus a selection of brackets to suit various applications

I ended up selecting the smallest bracket set and then painted the damper.
Fitting was a easy, attach the smallest bracket to the steering arm as close to the steering box as possible and the axle bracket as far away from the steering box as possible. The damper has 200mm of travel whereas the Frontera only requires 150mm so it is definitely long enough.

So what is it like to drive?
At first it was a little strange, steering wasn’t noticeably heavier but it didn’t self centre as nicely as it did without the damper. This might have been to do with the newness as after a few days use it has improved. Off road yes it has made a difference and it is staying on the vehicle.
Wheel Balancing
Having gone a little bonkas with some tyres was having a huge problem with wheel wobble. This wasn’t your usual 55 mph type high frequency wobble you could drive through but would start at just over 30 mph and was almost as if it had a buckled wheel. Having checked that the tyres had no bulges and the wheels were actually true I decided to give some balancing beads a try. Having spoken to a few peeps who had used products such as DynaBeads I decided to give it a go. A few guys had used plastic bb shot to great effect so ordered some up from eBay and popped 10 oz into each wheel. It did make a slight improvement but the wobble was still there and bad enough to stop me driving the vehicle.
With the limited success from balancing beads I then decided to go down the traditional wheel balancing route, problem was finding somewhere with a balancing machine big enough for a set of 33" rubber.
In the meantime I removed the balancing beads from the tyres and also checked the tracking, this was toeing out by about 4mm where it should have been 0mm to 1mm toe in. After getting the tracking sorted it was then off to get the wheels balanced, was a little surprised that with the balancing beads taken out and the tracking sorted it was actually better, than with the beads in, looks like the tracking was contributing to the huge wobble. However with the decision made to go for traditional balance weights I went ahead and had all 4 wheels done.
The wheels ended up with quite a large amount of lead attached, 2 wheels as approx 250g, 1 had 600g and last 1 had 750g to get them balanced.

It is now sorted, wheel wobble has gone and it is a pleasure to drive again. I am tempted to try balancing beads again now it looks like the tracking wasn’t helping. This can wait until the current balancing weights get knocked off though although having gone for stick on weights they should stay on there for a while
Powered by Qumana
Rear Bumper MKII – Its now tubular
This is well underway, have already made 1 for another Frontera owner and it turned out very well, started on the second one but this will have swivel recovery points fitted to it.
80mm Body Lift
This is now done and I have been running with it for about 6 months and no problems encountered so far. There is still a small snagging list to work through with the biggest issue being the transmission levers but overall it was a relatively easy job. Will post pics and a howto when I get chance.
Frontera Recovery Bumper
Had been toying with the idea of building a rear bumper with recovery points for a while and after killing the original bumper it forced me into actually getting it built.
The main concern was making sure not only the recovery points were strong enough but also the chassis mounts were going to be up to the job. I had seen a few other trucks with weld on D rings that looked like they would do the job and after some internet searching I found a supplier. The ones I opted for were rated up to 15T so should do the job. Having found the D rings, I needed to make sure that whatever they were attached to was not going to be a weak point. For this I used some 10mm steel plate, cut it into 125mm x 100mm squares and had a local fabricator weld the D rings onto these plates for me.
Next up was the bumper itself, this was 100mm x 60mm x 3mm box to which I tacked some 6mm brackets.
Then the recovery plates were tacked in place and some 5mm thick fillets cut and attached so that the recovery points were tied into the bumper brackets. Once the bumper was test fitted to make sure it was all going to line up OK, all the joints were seam welded.
Having made the bumper I didn’t think the std 10mm bolts and chassis were up to the job of holding it in place. The original 10mm nuts and bolts were replaced with 12mm jobbies and some extra 6mm plate welded onto the rear chassis to provide an additional 2 mounting points on both sides just in case.
After cleaning and painting this is what it looks like
Still not quite there though, next on the list is to relocate the number plate onto the rear door and move the fuel tank up further into the chassis.
Frontera Body Lift Part 5 – Rear Bumper
This didn’t happen, unfortunately I managed t reverse into a milestone at about 15mph which totalled the rear bumper so made a new one with some recovery points fitted instead
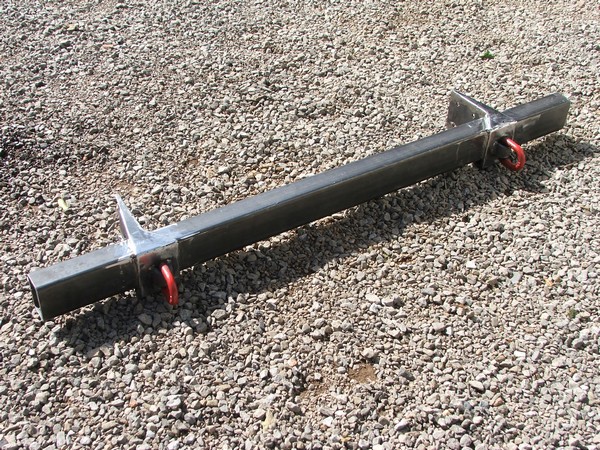
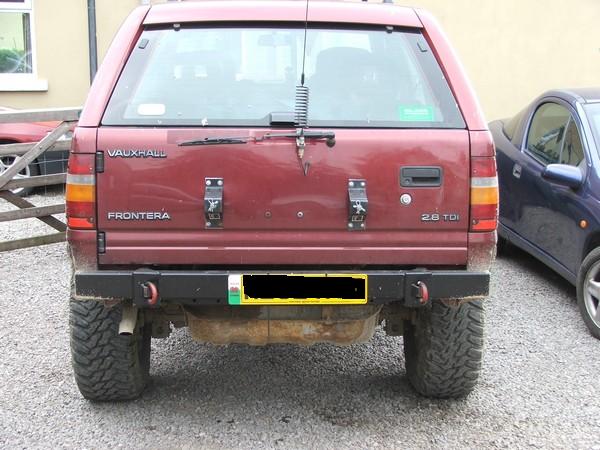
But a few peeps have asked how its done so will get some pictures taken and update this post
Frontera Body Lift Part 4 – Front Bumper
Now the fun begins, so far all of the work has been straight forward nut n bolt stuff and a no brainer, the front bumper needed reloacting and I had no info on where to go with this. It actually turned out to be very easy.
Checkout the picture, yep I know its a bit rusty looking, making it look pretty is on the to do list
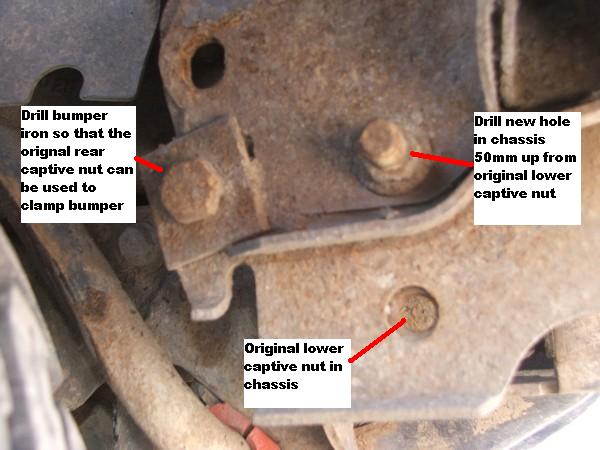
Okay, put into words
- On the front of the chassis, measure up 50mm from the original front captive nut for the bumper and drill a new hole. Do this on both sides.
- Bolt the bumper in place using this new hole making sure it lines up correctly with the body
- Drill a new hole in the bumper iron so the original rear captive nut in the chassis can be reused
Easy 😉
How strong is this now, well recently found out as I got swiped by a LandRover Discovery on the front right hand corner, bit of damage to the bumper end cap, the Disco’s front wing, drivers door, rear door and rear wing ain’t looking too good but the bumper on my Frontera didn’t move 🙂
Frontera Body Lift Part 3 – Fitting the Body Spacers
The day had come to actually do the lift, did the usual precaution of removing the battery (just in case) and then started on the lift.
Then in no particular order
- Removed front bumper
- Slackened hose clips on fuel tank filler and breather pipes
- Removed door sill trims, front kick panels and seat belt anchors so the carpet could be pulled back to get to the body bolts
- Removed the radiator fan shroud
Then it was time to start on the body mounting bolts. Working on one side at a time, all 6 mounting bolts were removed. A piece of timber (4″ x 2″) was placed along the underneath of the sill so that the body could be jacked up without any damage
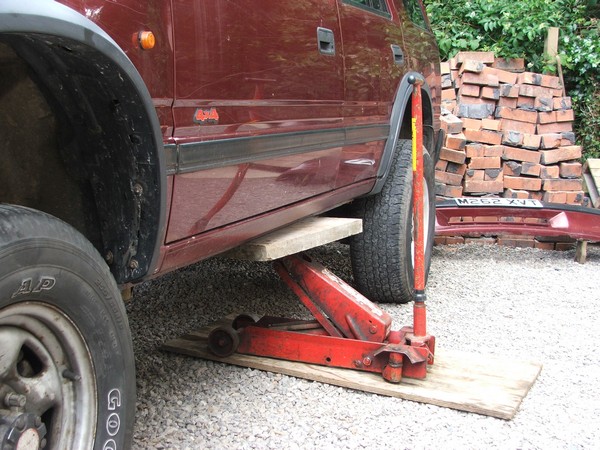
The body was lifted just enough so the rubber mounting bushes could be removed. These were then checked over to make sure they were servicable and given a quick wash to clean off all the mud and other crud picked up over the years. Also cleaned up the spacer tubes ready for refitting.
All of the body mounts were reused and then the spacer block placed on top of the rubber mounts and the new longer bolts fitted, body was lowered and then did a quick check to make sure that all of the spacers and mounts were sitting properly and the body mounting bolts tightened up. Once the first side was completed, the other side was tackled.
After all the spacers were fitted and bolted up tight, carpets, seat belt mounts, kick panels and sill trims were replaced.
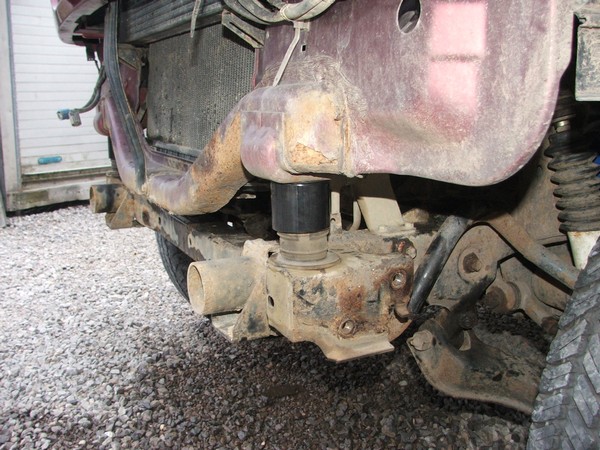
Next up was to check all the fuel lines, brake pipes, radiator hoses, intercooler pipes, PAS pipes etc to make sure nothing was stretched. Apart from loosening a few hose clips and realinging the pipes for the radiator, fuel tank and intercooler everything fitted, nothing needed extending or modifying.
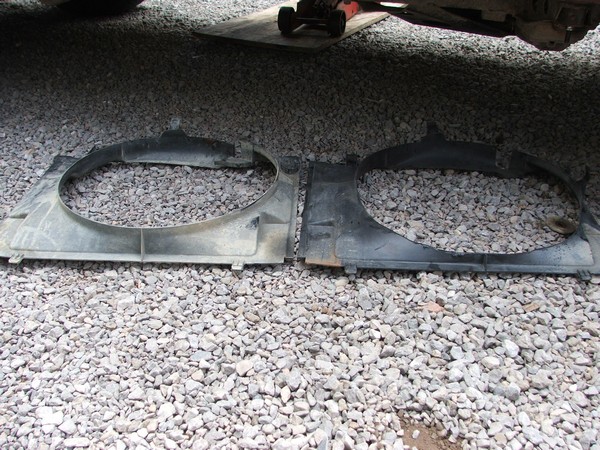
The cooling fan shroud however did. As the radiator is mounted on the body, lifting the body also lifts the radiator which meant the fan shroud was now too close to the fan and fouled. Quite an easy fix, trimmed back the lower edge of the shroud so it cleared and then refitted it
Frontera Body Lift Part 2 – Preparation
Seeing as my Frontera was 12 years old and had been subjected to lots of road salt I wanted to limit any potential problems with getting all the body mounting bolts and bumper bolts undone. So several days before starting the lift I went round all of the bolts and gave the exposed threads a good wire brushing and soaked them with penetrating oil. This was repeated daily and then on the last day I carefully removed the 6 rear bolts that go into captive nuts on the body, cleaned and greased them then refitted so come the day of the lift I was not gonna have any grief from rusty nuts!!
I also gave it the once over and checked that where the wiring loom, brake pipes, fuel lines and coolant pipes cross from the body to chassis there was enough slack to accomodate the lift. So far so good, with minor tweaking of the various clips it looked like these would give me no problems.
-
Recent
- Broken Steering
- Frontera Steering Damper
- Wheel Balancing
- Rear Bumper MKII – Its now tubular
- 80mm Body Lift
- Frontera Recovery Bumper
- Frontera Body Lift Part 5 – Rear Bumper
- Frontera Body Lift Part 4 – Front Bumper
- Frontera Body Lift Part 3 – Fitting the Body Spacers
- Frontera Body Lift Part 2 – Preparation
- Frontera Body Lift Part 1 – Research
- Introducing My Truck
-
Links
-
Archives
- October 2011 (1)
- July 2011 (2)
- March 2010 (2)
- October 2009 (1)
- July 2009 (3)
- May 2009 (3)
- October 2007 (1)
-
Categories
-
RSS
Entries RSS
Comments RSS


You must be logged in to post a comment.